How to properly connect underfloor heating. Connecting a cable underfloor heating to electricity. The principle of operation of the thermostat
The device of the underfloor heating system consists in the installation of heating elements under the floor covering and their further connection to a power source. This does not happen directly, but through a thermostat - a device that serves to adjust the temperature regime. Connecting a warm floor to a thermostat (thermostat) and electricity is a simple operation, so it can be done without the involvement of professional electricians. Moreover, caring manufacturers usually depict the wiring diagram for mounting on the cases of their thermostats. However, if you are a person who is completely ignorant of the wilds of electricity, some of the nuances may not be clear to you. We will try to take into account possible controversial nuances and describe the process of connecting the thermostat to the underfloor heating system in as much detail as possible - for dummies.
How does a thermostat work?
The thermostat is used to maintain a stable temperature in the "warm" system, as well as to turn on and off the heating mats (films). The device "reads" the temperature sensor readings and automatically turns off the power supply as soon as the floor heats up to the required limit. At the same time, he remains in working mode and continues to control the situation. If the sensor notifies of deviations in the temperature regime, the thermostat will again turn on electricity to the system and the floor will begin to heat up.
The most popular and reliable thermostats are mechanical and conventional electronic ones. More complex - electronic programmable. Despite the significant difference in their "stuffing", the principle of connecting thermostats is very similar.
The kit for the thermostat includes a temperature sensor, mounting box, terminals, installation and operating instructions
Installation and connection of the thermostat
The thermostat is usually mounted into the wall like a normal switch. For it, a place is chosen near the existing electrical wiring, for example, near the outlet. First, a recess is made in the wall, a thermostat mounting box is installed there, wires (phase and zero) of the mains and a temperature sensor are connected to it. The next step is to connect the thermostat.
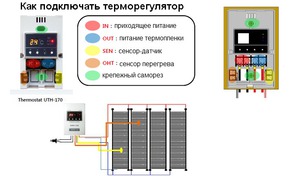
On the side of the thermostat are "nests". The wires of the network (220V), the sensor and the heating cable are brought here.
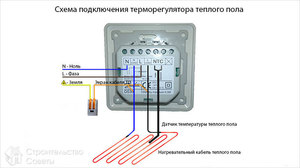
It is useful to know that the wires that are connected when installing the thermostat are color-coded:
- white (black, brown) wire - L phase;
- blue wire - N zero;
- yellow-green wire - ground.
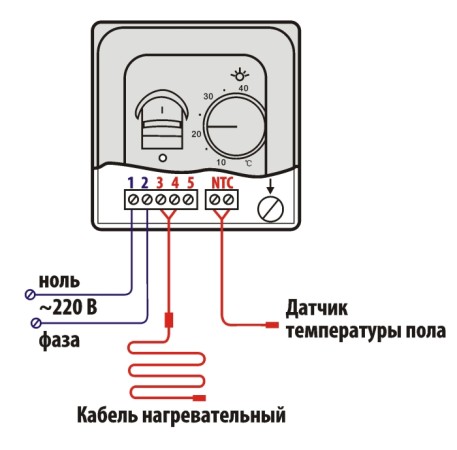
Connecting a warm floor to electricity is performed in the following order:
- To "nests" 1 and 2 connect network wires with a voltage of 220V. Polarity is strictly observed: wire L (phase) is connected to pin 1, wire N (zero) is connected to pin 2.
- A heating cable for underfloor heating is connected to contacts 3 and 4 according to the principle: 3 contact - wire N (zero), 4 contact - wire L (phase).
- The wires of the temperature sensor (usually built into the floor, that is, determining the temperature in the thickness of the floor) are connected to "sockets" 6 and 7. The principles of polarity do not need to be observed here.
- Check the thermostat is working. To do this, turn on the -220V power supply, set the minimum temperature on the device and turn on the system of heating elements (by turning the knob or pressing the button). After that, the heating mode is changed to the maximum, that is, the thermostat is “programmed” to the highest temperature that is possible for it. The correct operation of the device will report itself with a click, which will indicate the closing of the heating circuit.
Connection schemes may vary slightly, depending on the types and models of thermostats. Therefore, so that the user does not make a mistake, as a rule, all contacts are written on the device case.
With the onset of cold weather, many begin to think about the additional heating of their homes. Since with the beginning of the heating season, as a rule, repair work begins at the sites of gusts of heating mains. Or there are thoughts to go to electric heating, as an additional alternative for a country house. In this article we will talk about a temperature-controlling device - a thermostat, namely, we will talk about how the thermostat is installed and connected to an infrared heater.
Installation nuances
We will not go into the types and types of regulators, arrange comparisons and tournaments. All of them are good in their own way and will fulfill their purpose, serving faithfully. The first thing you want to pay attention to is the installation location. It does not depend on what type of heaters you have - infrared, panel, convection.
The installation of a thermostat with an air temperature sensor is prohibited in the following places:
- in close proximity to heaters;
- in places where there is a draft;
- in the heating zone of infrared emitters.
All these places are unsuitable for placing a thermostat, because when located near a heater, the air next to it will heat up to the desired temperature earlier, which will lead to false alarms, as a result of which the room will not heat up to a comfortable temperature.
If you install a thermostat in the heating zone of the IR heater, its body will heat up earlier and distort the sensor readings. In places where there is a draft, the sensor will not show the desired temperature and the heaters will overheat the room, consuming excess electricity. The placement of the temperature sensor in height should be done in the comfort zone, at a level of 1.5 meters from the floor.
Wiring diagrams
Always, before installing and connecting the thermostat, read the instructions and passport data for the device. Since the manufacturer indicates the required cable cross-section and gives a connection diagram for their products. In case of deviation from the requirements and savings on wire and thermostats, there is a high probability of equipment failure or a fire hazard.
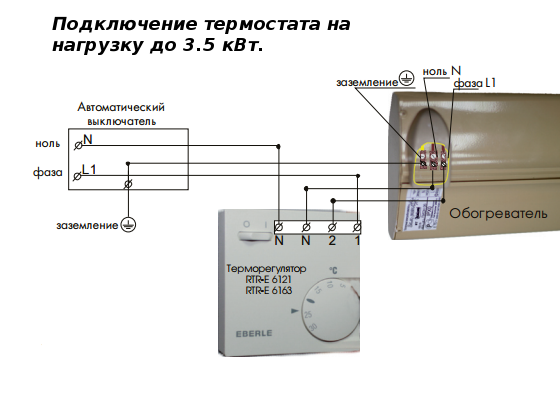
Scheme of connecting the thermostat to an infrared heater with a power of up to 3.5 kW:
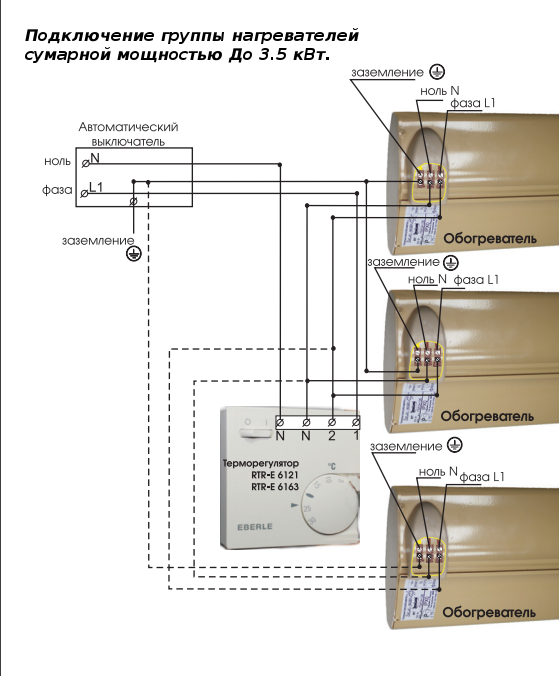
If the space is heated by a group of heaters up to 3.5 kW, then the connection diagram will look like this:
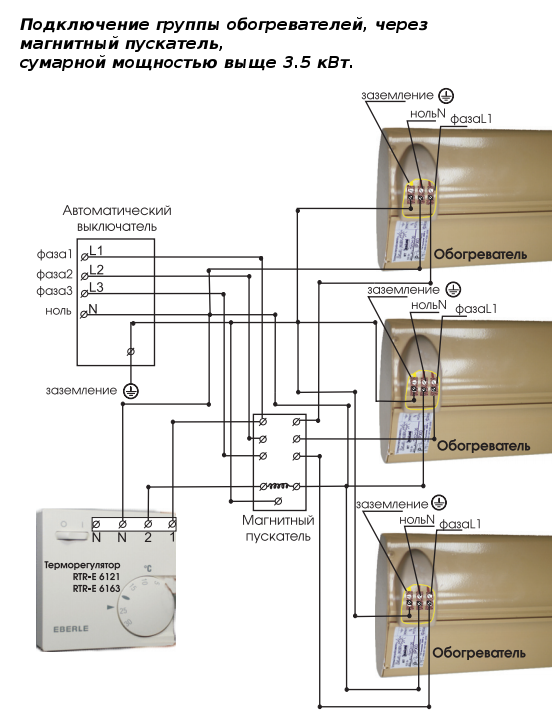
In the event that you are the owner of a three-phase network and heating is carried out by a group of heaters with a total power of more than 3.5 kW, then a magnetic starter is added to the control circuit, which is controlled by a thermostat:
This is how the temperature controller is installed. As you can see, there are some features in the installation and connection of the thermostat, so it is important to initially read the instructions from the manufacturer, and then proceed to the main process.
Like( 0 ) I do not like( 0 )
More and more apartment owners choose underfloor heating to heat their homes. The stores offer a wide variety of such systems, so you can easily choose the right one for the price and power. It is not necessary to invite specialists to install it. This work is quite simple, so the installation can be done independently. Unlike a water floor, the electric version can be used in almost any room.
The work of installing an electric underfloor heating consists in the proper placement of the heating elements that form its basis. When the film with heating cables is laid, it is only necessary to connect the floor to the thermostat and power supply. To connect various mounting schemes are used, the choice of which is made taking into account the heating element used in the heating system and the configuration of the room.
Varieties
Electric underfloor heating is characterized by a common type of power supply, however, they may differ in the design of the heating elements. To understand how to properly connect this system, you need to decide what kind of system you will install in your home.
As a heating base in warm floors can be:
- resistive cable;
- self-regulating cable;
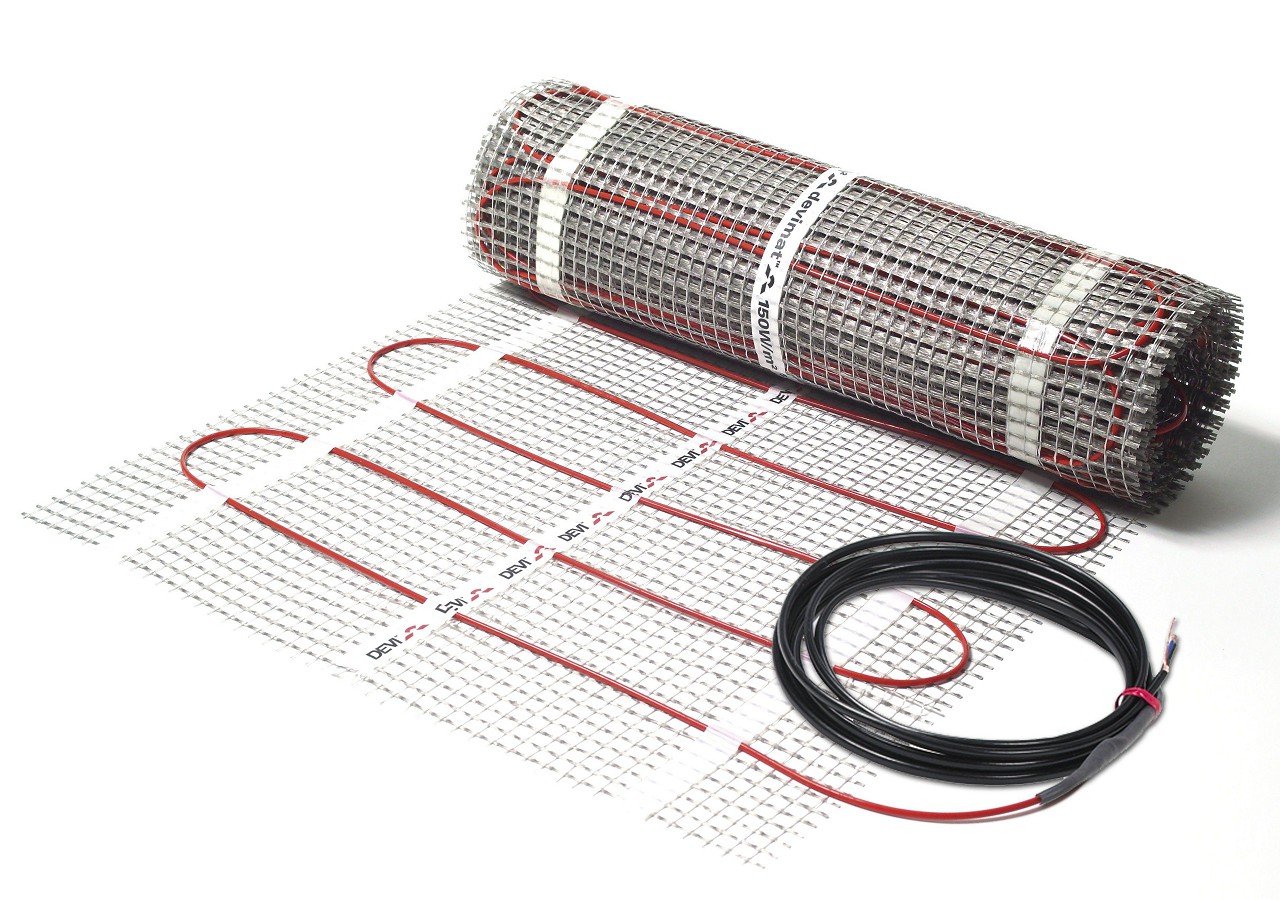
- thermal mats;
- heating film;
- carbon rods.
Each of these options has its own scheme, according to which it must be connected.
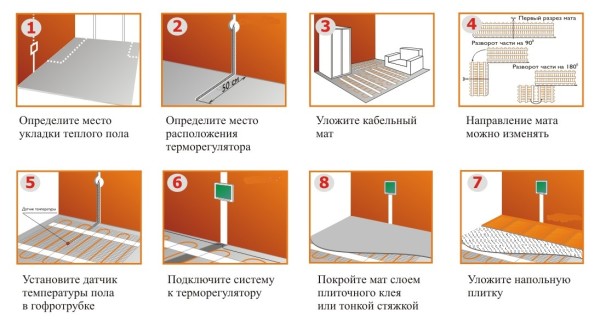
When installing the cable floor, it is necessary to determine in advance the laying scheme and produce necessary calculations. This will help to avoid the release of excess heat and eliminate uneven heating of the floor surface.
When buying heating mats or films, they are guided by the manufacturer's recommendations, which are indicated on the packaging.
How to connect a thermostat?
Before proceeding with the connection of a warm floor, it is necessary to determine the place where it will be installed.
Installing a thermostat
 This device is mainly used to control the system, as well as to maintain the required temperature in the room. In addition, the thermostat allows you to connect the heating elements of the heating system to the electrical network. In stores, thermostats are offered in a wide range. There are both simple mechanical devices and more advanced electronic devices.
The thermostat, which has a built-in sensor, provides registration of the air temperature in the room. Their installation is carried out at a height of at least 1.5 m from the floor surface. For placement, choose places where protection from a heat source such as direct sunlight will be provided.
Before proceeding with the connection of the thermostat, it is necessary to decide how this will be done. You can do:
- fixed connection from the electrical panel;
- connect using a standard electrical outlet.
The circuit is equipped with most models of thermostats. On the body, it is usually depicted. This allows you to facilitate the connection procedure and do it yourself without contacting a specialist.
When the installation of the thermostat to the junction box is completed, it is necessary to bring the phase, as well as arrange grounding. A groove should be drilled in the wall, in which two plastic tubes will be placed. One of them is used for power cables, the other designed to test the internal sensor, which will be placed under the floor during operation. When all work on connecting the thermostat is completed, you can proceed to the installation and connection of the electric underfloor heating.
How to connect cable underfloor heating?
 Having finished with the connection of the thermostat, it is necessary to level the surface, and then attach the tape along the wall. Next, lay the insulating layer. Cable installation can be carried out on the surface of the subfloor provided that a heated room is located under it. Before laying it, you should stretch the power cables from the thermostat box.
- The mounting tape must be placed on the surface of the subfloor and the layer of heat-insulating material. It is necessary to securely fix the cable. The snake is the most convenient way to lay the cable.
- Using mounting tape fasteners, you can evenly position the conductor. After the cabling is completed, the sensor must be installed. It is placed under a plastic tube. At the end of the installation, it is necessary to check the quality of work. For this use a tester and check the resistance of the cable. It must correspond to the value indicated in the passport. After that, you can proceed to the stage of pouring the screed.
- It is necessary to start connecting an electric underfloor heating with a thermostat after the screed has hardened. When the cement-sand mortar gains the required strength, power wires from the heating sections of the sensor should be connected. The electrical wiring is connected to the thermostat, which powers the system. As fasteners screw terminals are used. This stage is one of the most difficult, so it is best to involve professionals for its implementation.
Connection of thermal mats
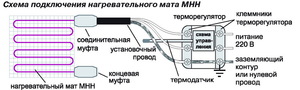 If you arrange a warm floor in your home, the basis of which are heating mats, then you will not encounter great difficulties during work. The principle of operation of the installation of such a heating system is similar to cable underfloor heating. Therefore, it is worth dwelling in more detail on the main differences during work.
The thermal mat is a thin heating cable, which is fixed on a heat-resistant film. For the reason that the laying step is already set on it, the owner it is only necessary to determine the area on which such a system will be located. You should also solve the issue with its power.
Before you connect the power to the underfloor heating system, you need to lay out the film with the cable on the subfloor surface. Then it is poured with a thin layer of screed or it can be filled with a layer of tile adhesive. Then you should cover the laid film with a layer of finishing. The use of a heat-insulating layer is unacceptable. Its presence leads to overheating of the system, which reduces its service life.
In finished form, such a warm floor has a thickness of only 2 cm, so to place the sensor, you need to make a recess on the floor surface.
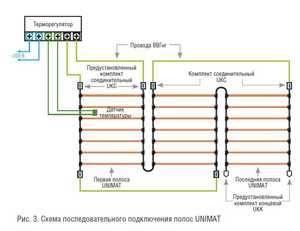
If there are not enough cold ends to connect the heating system to the thermostat, then parts of the cable must be cut out of the mat. A coupling should be placed inside the screed. Since a type of heating cable is a thermal mat, there are common points in the installation of both systems.
The difference is that the work is faster and the owner does not have big difficulties. Since the device of such heating systems does not require the creation of a thermal insulation layer, and the screed layer itself is quite thin, the installation of such a heating system is a fairly profitable solution. The price for it will be noticeably lower, since during the work there is a saving on materials, and the amount of work is minimal. Also, the advantage of such a system is that it can be installed with a thermostat in any room.
Features of connecting a film heating system
 A warm floor based on a heating film is one of the relatively new types of warm floors. To understand how to connect a warm floor, you need to get better acquainted with the features of this system. It incorporates heating elements that are sealed in a heat-resistant material with a small thickness. Copper conductors run along the edges of the film. When installing the system, they are connected to the electrical network.
Connection nuances
The connection of a warm film floor occurs in the same way as the installation of mats. The main difference is not only in the use of a substrate, which must be placed over the entire surface of the insulation. As a substrate, a material having a coating with a foil film is used.
At the stage of laying the sensors, it is necessary to use a plastic tube, which should be placed in a recess previously made in the floor. Another installation option is also possible. The device is fixed on the surface of the film.
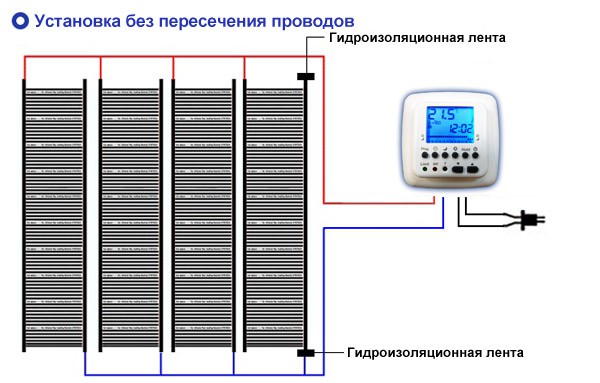
Sheets of film should be spread out, and then connected in parallel. It is necessary to connect one wire of the pair to the next sheet. The other is used to connect the IR floor heating to the thermostat. Film floor heating is an universal system heating as it is compatible with any coating. It goes well with laminate, and worst of all with carpet. In the latter case, the use of carpeting can lead to damage to the underfloor heating film due to high pressure on the surface of the floor covering.
Modern homes are increasingly equipped with warm floors. After all, the availability of this method of heating increases with a constant high efficiency. Despite the simplicity of the very design of underfloor heating, they can be called the best option for heating a house or its additional.
Underfloor heating in its design can be of two main types: water and electric. Consider how an electric underfloor heating works and connects.
The principle of operation of warm electric floors simple: they convert electrical energy into thermal energy due to the resistance of conductors. At the same time, the screed or tile warms up. It is these materials that are able to evenly distribute heat over the entire area and give it to the environment.
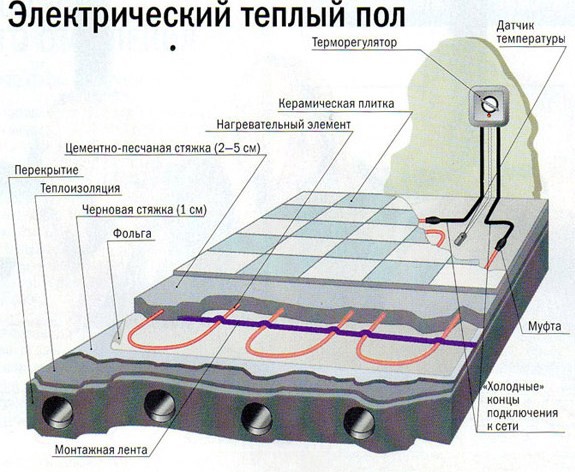
Underfloor heating powered by electricity has a fairly simple design and consists of the following main parts:
- heating element (depending on the type, it may be a cable or a mat);
- temperature sensor;
- thermostat.
Many people think that it is difficult to lay a warm floor and it is difficult to connect it to electricity. In fact, at its core, this type of underfloor heating resembles ordinary wiring, which is laid in layers of screed or under tiles. For full-fledged work, an ordinary socket is enough, where there is an alternating current with a voltage of 220 V.
The connection scheme itself does not cause any difficulties - this does not even require special knowledge. But be sure to remember during work that this is an electric current, which, if mishandled, can greatly harm a person, even death. To prevent this from happening, you must clearly follow a number of rules when choosing and connecting.
Selecting the power of a warm floor
The most important indicator that you need to focus on when choosing underfloor heating is their power. This criterion depends on the following points:
- floor area to be heated;
- type of heating required (additional or main);
- type of room where heating will be carried out (balcony, living room, office, warehouse).
The type of connection to the network and the presence of additional elements depend on the power.

When carrying out calculations of a warm floor, you need to take only the usable area where a person is most often located. So, if this is a kitchen, then under the furniture and the refrigerator you can not calculate the area. When making calculations, it is imperative to determine in advance the location of all heating elements, since it will be impossible to change their positions in the future.
If you decide to use a warm floor as the main heating, then the area allocated for it should be at least 70% of the entire room.
Specific power of underfloor heating and its calculation
Warm floors can be used both as the main source of heat in the house, and as heating. For the first type, the calculation is taken approximately 150-170 W per 1 sq.m. Heating is calculated based on the values of 110-130 W per 1 sq.m.
This indicator may vary slightly depending on the type of heated room. For example, rooms where people are constantly occupied must necessarily have very warm floors, and for this reason the calculated power consumption is increased. If this is a kitchen or bathroom, then here you can not overestimate the values \u200b\u200bbecause residents spend little time in them.
Types of electric underfloor heating and thermostats
Now there are two types of electric underfloor heating:
- cable or sectional;
- mats, infrared film systems.
Each of these types has its own characteristics and is used in specific cases. So, if a warm floor is mounted in a concrete screed, then it is better to use a cable type. Mats or film heating elements are best suited for tiles.
Naturally, the main part of the warm floor is itself heating element. But it fully works thanks to thermostat, which is the heart of the system.
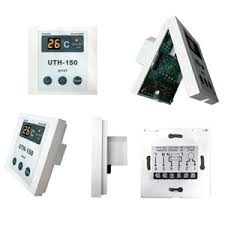
It allows you to maintain the desired surface temperature. Buying a thermostat is not a problem: it can be either mechanical, with manual setting and temperature control, or fully automatic, with surface temperature measurement, indoor air temperature and selection of the most optimal parameters.

Connecting the thermostat to the system
Before connecting a warm floor, regardless of its type, you need to determine the location of the thermostat. This device is used to maintain a stable set temperature indoors. In addition, by means of a thermostat, a direct connection of a warm floor to the network is made.
The thermostat is installed at a height of at least 1.5 meters from the floor and in places where it will be completely protected from high temperatures. This will allow you to make measurements as accurately as possible and set the desired floor heating.
Before connecting the thermostat, you must first decide what method it will be done: powered from the shield or using an outlet. It should be noted right away that these two methods involve the additional inclusion of a circuit breaker in the circuit, which will operate in the event of breakdowns, overheating or short circuits. Its maximum shutdown power is selected depending on the type of underfloor heating.
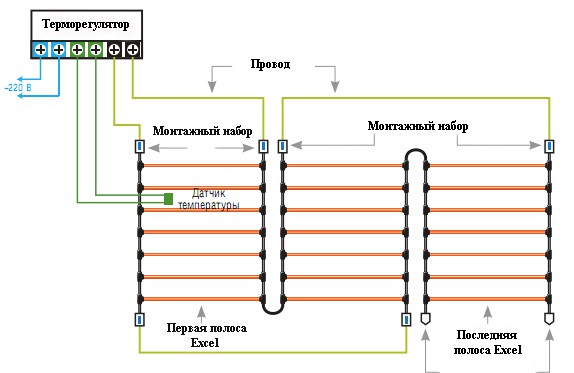
In most cases, the connection diagram is indicated on the thermostat, which greatly simplifies installation without the help of electricians. If there is no diagram, then the following wires must be connected to the following terminals:
- 1 terminal - network phase;
- 2 terminal - network zero;
- 3, 4 terminals - conductors of the heating element;
- 5 terminal - timer;
- 6, 7 terminals - floor temperature sensor.
This distribution is standard, but it should be understood that different manufacturers may create circuits that require a different connection. It all depends on the design and additional features of the system.

Before connecting, you need to cut a small ditch in the wall. It will house two plastic tubes. In the future, the wires of the heating element will be passed into one, and the temperature sensor will be located in the second. At the end of these activities, you can proceed with the installation and connection of the entire underfloor heating system.
Connecting a cable-type underfloor heating system
To connect a cable underfloor heating, you need to level the surface. Next, attach a damper tape along the wall and then lay the thermal insulation. Cable installation can also be carried out on an old surface, without lining. The only condition for this is the presence of a heated room from below. Before laying the cable, you need to stretch all the wires to connect to the thermostat.
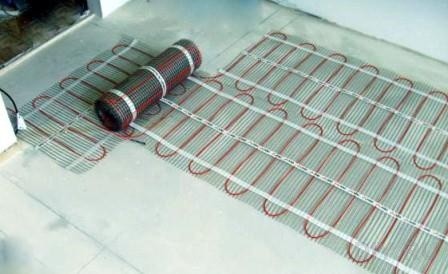
Next, you can lay the heating element, after placing the usual mounting tape on the floor. This is done so that the cable is held in the desired position and does not move. You can lay the cable in any shape, the main thing is that it does not intersect with itself. The most efficient and convenient installation method is the so-called "snake" - the cables are sold in rolls, already laid in the form of a coil on the grid.
Evenly distributing the cable, you can fix it. It is important that the edges do not reach the location of furniture or walls by about 10 cm. Next, you need to lay a temperature sensor, which is hidden in the tube mentioned earlier. Its location should be at a distance of 40-50 cm from the edge of the coil of the heating element.
This completes the installation of the cable and sensor. Using a tester, you need to check the resistance of the heating element. It must match the passport data. Next, you need to fill everything with a screed and wait until it hardens. It is impossible to immediately turn on the warm floor to dry it, as cracks will appear and the strength indicator will significantly decrease. It remains just to connect all the wires to the thermostat and check the system's performance.
Connecting a warm floor in mats
To figure out how to connect a warm floor in mats, you do not need to have a lot of knowledge and experience. The basic principle is about the same as that of the cable type. It is worth noting some differences.
A thermal mat is a heat-resistant film on which a heating element is attached. Since the pitch and shape of the laying is already set during production, you only need to calculate the area to be heated and the power consumption.
When installing such heating, it is necessary to lay out the mats on the surface, according to the calculated area. Then everything is poured with a thin concrete screed or glue is applied for laying tiles. A very important point is lack of thermal insulation. This can lead to overheating of the system and its failure.
If the length of the cold leads is not enough to connect, just a piece of mat is used. The coupling must be located inside the screed itself.
Connection to the electrical circuit of a film type underfloor heating
Underfloor heating film type is a relatively new invention. It is made of a special heating film. With the connection of this system, even the most experienced builders can have problems. In order to do this without problems, it is necessary to deal with the film floor heating system itself.
The film underfloor heating system consists of special carbon and bimetallic heating elements, which are soldered in a special heat-resistant material. Copper contacts are located along the edges of the film. They connect the device to the network.
The connection itself is carried out by soldering the wires to the terminals and leading them to the thermostat. A feature of laying is the use of a substrate that has a foil surface. This solution allows heat to be reflected from the lower surface and directed completely to floor heating.
The temperature sensor is installed, as a rule, in a special recess under the film itself, but options for its location on the surface are not excluded. Also, this type can be cut according to special marks that are applied by the manufacturer. They are located at a distance of up to 30 cm from each other. When the laying is done, you can connect the sheets in a parallel way.
The main difference of a film heat-insulated floor is that it approaches under any surfaces. The only exception is its installation under the carpet, as there is a high probability of damage to the integrity of the film.
The decision to make a warm floor in the house has always been justified. It is convenient, practical and quite economical. And if there are children in the house, a warm floor will allow parents not to worry that they will freeze and get sick.
During the heating season, many owners are thinking about installing alternative heating appliances. Such equipment should be energy efficient and create high-quality space heating. One of best solutions today is an electric underfloor heating. It consumes less energy compared to other heaters. The principle of its operation allows you to create the most comfortable heating.
Installing such a system is very simple. Connecting a warm floor to electricity, the scheme of which is presented in detail in the manufacturer's instructions, will help with this. Before installation, it is necessary to study the installation process in stages. If everything is done correctly, the warranty from the manufacturer will be valid during the operation of the self-connected system. For some manufacturers, it reaches 20-25 years.
The principle of electric heating
The popularity of underfloor heating is growing every year. This is due to the many features of such systems. You can install an electric underfloor heating under almost any surface. The presented system is mounted in each room. Unlike convectors, radiators and other similar devices, an electric wire heats up the floor covering. Therefore, the highest temperatures are observed at the bottom of the room. At the ceiling, the air is colder.
Therefore, this principle of heating is as comfortable as possible for a person. Convectors, on the contrary, contribute to the accumulation of the most heated air masses near the ceiling. At the bottom, the lowest temperatures are determined. But people are in this zone. Therefore, energy is used inefficiently.
Connecting a warm floor to electricity, the diagram of which is presented in the instructions, is very simple. This process is easy to do on your own.
Types of systems
When studying the question of how to connect a warm floor to electricity, it is necessary to consider the existing types of systems. Most often, wires are used for the presented purposes. This product consists of a nichrome core, around which various insulating shells are created. 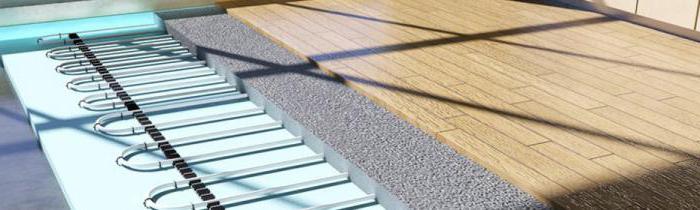
The cable comes in different sizes. If the diameter of the product in the section reaches approximately 7 mm, it is mounted in a screed. According to building codes, this layer is from 3 to 5 cm. If the screed is smaller, the heat is unevenly distributed. Warmer and cooler zones will be felt.
If it is not possible to make a screed in the room (raise the floor level by 5-7 cm), a thin wire is used. Its diameter is 3.5 mm. This system is mounted directly into the tile adhesive. The solution layer in this case is only 5-8 mm. This system heats up faster, but also cools down literally 30 minutes after being turned off.
Infrared warm floor
Classic options for underfloor heating are filled with mortar. But if the wooden base is already ready in the room, this type of system is not suitable. In this case, it is applied in the form of a film. 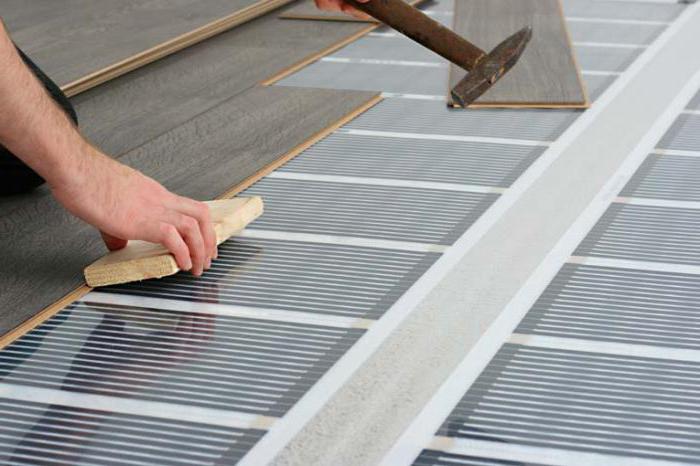
Preferably, the heating element in such a device is carbon paste. The scheme for connecting a film underfloor heating to electricity is almost no different from a wire. But there are several nuances here.
The operation of infrared film is similar to the heat of the sun. The rays do not heat the air, but the surrounding objects become warm. Do not put mortar or glue on the film. Such systems are designed purely for dry installation. Tile adhesive or screed will corrode the film over time.
But under a laminate, linoleum or thin carpet, the film is installed very simply. In this case, its effectiveness will be maximum. The scope of infrared floor heating is extensive. It is even mounted in animal enclosures, behind mirrors, in incubators and so on.
Purpose of the system
Can be comfortable or autonomous. In order not to use any heating devices in the room, except for electric wires, you will need to cover about 70% of the room area with them. 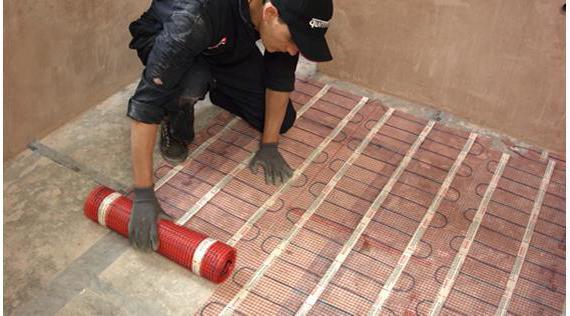
The screed or tile adhesive will heat up and give off heat to the environment. This can be compared to a heated convector panel located all over the base of the room.
Features of connecting a warm floor must be taken into account when creating heating in each room. Comfortable heating is created if the system is mounted under a small area of flooring. It will be warm to walk on this surface, but other devices should be used to heat the room.
Film underfloor heating was originally designed for comfortable heating. The wooden base requires heating not higher than +30 ºС. Therefore, it creates only comfortable heating.
thermostat
Whatever system the owners of an apartment or house choose, it must be connected to the network through a thermostat. This device controls the degree of heating. There are various thermostats on the market.
In the simplest version, the device has a built-in or remote sensor that measures the temperature. In the simplest version, the device has a built-in or remote sensor that measures the temperature. Some models have both types of metering at the same time. There are also two-zone varieties, in which there are 2 remote sensors at once.
The thermostat can be controlled mechanically or by setting a weekly program. On the reverse side, the device can have from 4 to 9 terminals. But most often there are only 6 of them. 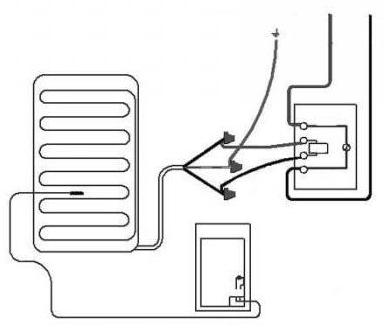
Two terminals are designed to connect a remote sensor. If it is built into the case, then there will be 4 sockets for connection. The next two terminals are for connecting wires from the network (phase and zero).
Next, the underfloor heating is connected to electricity. The circuit, the features of which are determined by the type of thermostat and the system itself, involves connecting 2 wires from the heating element to the last 2 terminals.
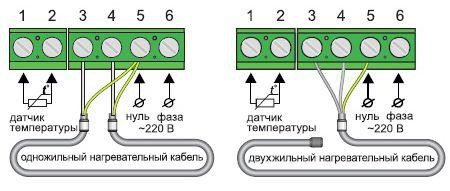
solid wire
On sale there are heating wires of single-core and two-core type. Their connection is somewhat different. Any thermostat is suitable for such systems. Most often, these devices can withstand a load of 3.5 kW. But there are thermostats with smaller parameters.
Therefore, before connecting, the total power of the system must be taken into account. A single-core wire has contacts on both sides for connection. This must be taken into account in the layout process. Both ends should return to the same thermostat. Next, the underfloor heating is connected to electricity. How easy it is to do this job, the manufacturer's instructions will help. 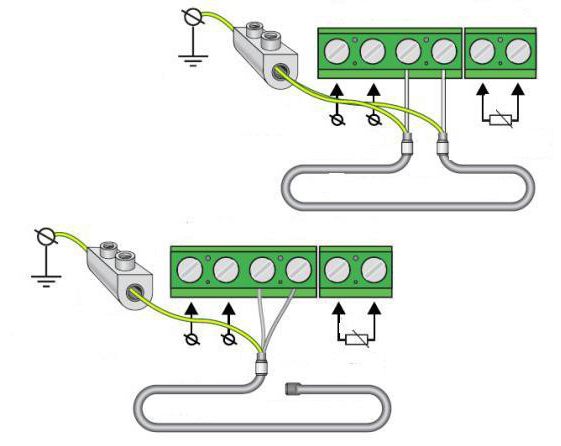
The heating wire is connected to the cold connection via a sleeve. For installation in a single-core system, 3 wires come out on each side (blue, brown and green-yellow). Before connecting, the contacts of the corresponding color are connected and inserted into the thermostat terminals.
Two-core wire
Two-wire wire is more often on sale. It is easier to install. Its first end also has a cold wire for connection. The second edge, unlike a single-core system, is sealed. There are no wires coming out of here.
Therefore, the soldered end can be left far from the thermostat when laying out the system. Appropriate cold wires are included in the terminals of the device. This is a simpler scheme for connecting a warm floor (the instruction is always attached to the product by the manufacturer).
Infrared warm floor
A slightly different way is to connect an infrared warm floor. The film is sold in the form of a roll. It can be cut in certain places to lay the film over the desired area. 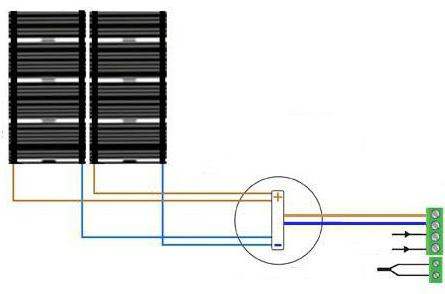
The kit also includes special clamps. You will need wire and bituminous insulation. Metal clips are put on the contacts of the film, a wire is brought to them. The joints are isolated with bituminous material.
Self-regulating wire
It is used for heating pipes and tanks in winter. It is purchased less frequently than the listed systems. But in some cases it is irreplaceable. This wire is not afraid of overheating. It can be mounted without a tie.
Thanks to a special device, this product is able to change the heating level depending on the ambient temperature. Therefore, in this case, a thermostat is not required.
Connecting a warm floor to electricity (the circuit involves the use of a thermostat) is simple. It can be performed even by a master who does not have much experience in carrying out such work.