Connection of the washing machine to the water supply diameter. How to connect the washing machine to the water supply and sewerage
The automated process of washing clothes has already become a daily norm. Now there is no need to accumulate contaminated things.
Simply load them into the machine when needed, and then she will wash them, wring them out and prepare everything for the final drying. Therefore, such household appliances work in almost every family.
However, many owners are still interested in the question of its correct commissioning. Our advice will allow the home master to better understand several ways of the installation and connection process. washing machine to plumbing, sewerage and electricity with your own hands, choose from them the most suitable method for your purposes.
Preparatory work
The main attention should be paid to the place where the washing machine will work. It will require:
- space, which depends on the brand of model and design (vertical or horizontal loading of laundry);
- highway proximity:
- plumbing;
- sewerage;
- wiring.
A washing machine is usually installed inside the apartment;
- in the bathroom;
- on the kitchen;
- less often in the toilet.
Sometimes you have to allocate a place for her inside the corridor. But, this is an extreme case when it is impossible to place it in other rooms.
Unpacking the new washing machine
When the purchase is delivered home and removed from the packaging box, you will need to remove the fasteners: bars, brackets, bolts. They fixed the unit during transportation and protected it from mechanical shocks.
There will be a protective film on the surface of the washing machine, which must be removed.

The rotating tank is locked with fixing bolts. They must be unscrewed, and plastic plugs should be placed in the vacated holes.

Turning on the washing machine in operation with the tank mount not removed will overload the electric motor and burn it out when.
Ways to connect to the sewer
Common drain methods:
- mobile hose to the toilet or bath;
- with a siphon
- directly into the sewer pipe.
Using any of these methods, it is necessary to prevent the "self-draining" of water from the tank during operation. To do this, the return end of the hose must be raised to a certain height above the level of sewage sewage.
Draining water into a toilet or bath
The method is very old. They were used on the first models of washing machines with activators.

Now it is rarely used: such a drain must be observed by controlling the position of the hose, the end of which is made in the form of a hook.
Connection via siphon with outlet
Drain hoses are fixed permanently. The siphon, which prevents the penetration of unpleasant odors from the sewer, is supplied with an adapter for connecting the drain from the washing machine.

Another scheme will also work, but sewage with the appropriate aromas can penetrate from the sewer pipe into the hose.
Drain into the sewer pipe
In old cast-iron sewer pipes and new plastic ones, thicker than 5 cm in diameter, it is possible to drain without installing a siphon.

It’s just that its configuration is created with a drain hose, bending with the letter S and raising half a meter above the floor level. Its end is located above the sewage level.
The washing machine may have a check valve in the drain line. When it is not there, the manufacturer indicates the limits of the hose lifting level. If they are not adhered to, then the washing technology may be violated, and
Ways to connect to the water supply
The washing machine requires a connection to clean water and a pressure in the system of at least 1 atmosphere. When these requirements are violated, an additional pump or cleaning filters are used.
On the pressure supply side, it is necessary to provide for the possibility of shutting off the water in case of accidents. To do this, put a ball valve. The ideal case is considered to be the presence of a nest on the water supply for its installation. But most often you have to use other methods.
Water supply methods:
- insertion into a metal pipe through a compression sleeve;
- fitting for metal-plastic;
- tee for steel pipes:
- no fixed plumbing.
If a pressure line from steel pipe, then it can be cut into by drilling a hole and installing a compression sleeve through the sealing gasket.

It consists of two detachable clips fastened with a bolted connection. A water supply hose is screwed into its threaded outlet.

The method works well on new pipes. On the old water supply it is necessary to check their quality. Due to corrosion of the metal, the walls can be partially damaged.
Fitting for metal-plastic
It is convenient to cut a metal-plastic water pipe, remove a small piece and insert a specialized tee - a fitting through rubber gaskets.

A ball valve with a pressure hose is screwed into it.
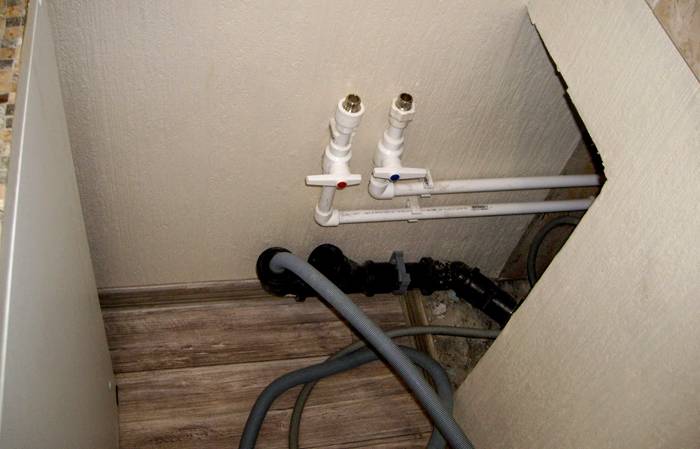
Tee for water pipes
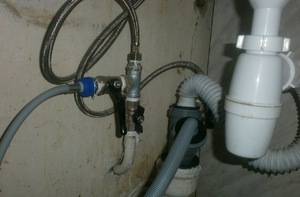
Inside the bathroom and in the kitchen, you can screw a tee with a drain line into the water supply pipe.

It is installed even in a cold water main in front of the mixer, and for hot water just add an extra bushing.
![]()
Even in the toilet, at the place where the toilet is connected, you can install a tee by screwing a hose to it.
Connection without plumbing
The issue is relevant for all rural residents who use water from a well. The difficulty lies in the fact that it is required to create a pressure at the inlet using a pumping station of more than one atmosphere. Draining through a hose is usually not difficult.

Home craftsmen successfully solve such problems with their own hands. One option is to install an additional large volume tank at a height of more than a meter.
However, there is another solution - to redo the internal circuit of the hydraulics and electrics of the washing machine by connecting an additional module with pumps and taking water from a nearby tank through a hose.

In addition, now there are manufacturers who already produce similar models of washing machines, adapted to work without running water in rural areas.
Electric installation work
The washing machine is powered by electricity. It must be brought securely and.
Electrical connection
A modern washing machine is designed to work in a three-wire electrical circuit,. Its factory power cord terminates in a three-prong plug that simply plugs into the appropriate outlet.
Its body is chosen with a closing lid to comply

In the absence of grounding with inclusion in a two-wire socket, a potential of 110 volts appears on the PE conductor and the housing.

Only an RCD or difavtomat can protect a person from electric shock.

But for its proper operation, it is necessary to have a PE conductor securely connected to the ground loop. At the cottage and in a private house.

In multi-storey urban buildings, such issues are dealt with by employees of power supply organizations.
How to secure a stable position
The washing machine drum during operation creates vibrations due to the fact that the laundry and water inside it are distributed randomly with a shift in the center of mass. These vibrations are smoothed out by damping mounting springs.

They are tuned for optimal performance under strict conditions.
Therefore, adjusting bolts with fixing nuts are installed on the body mounting legs. Their position expose the horizontal plane.

Test trials
The check begins with an external inspection and reconciliation of the position of all controls according to the instructions. When it is finished, a test run is made.
First, the time of filling the tank with water and the absence of leaks are analyzed. When they are found, everything is poured into the sewer pipe, and the malfunctions are eliminated.
After checking the tightness of the water mains, the water heating time and the absence of noise during operation are controlled.
Then pay attention to the mode of washing and spinning clothes, draining the water. After a positive assessment of the test results, the washing machine is put into operation.
As you can see, it is quite possible to connect the washing machine to the water supply, and even if it is not available in a private house in the countryside, it is quite possible with your own hands.
The connection of the washing machine to the water supply and sewerage, performed without violations, will ensure the correct operation of household equipment. All stages of work are important - from choosing the installation site and unpacking the unit to connecting it to utility systems. Using the advice of professionals, it is much easier to avoid mistakes and ensure the accuracy of the work.
In a standard-plan apartment, the choice of places for installing a washing machine is limited. However, in private homes, such units are often installed in the same places:
- bathroom,
- shared bathroom,
- toilet (only suitable for compact modifications with vertical loading),
- kitchen.
Modern designers often suggest installing a washing machine in the hallway for space-saving reasons in already cramped bathrooms. How to connect the washing machine to the sewerage and water supply in this case? Additional alteration of engineering networks will be required with the involvement of specialists, which, moreover, may require permission if you live in an urban high-rise building.
The choice of location for mounting the machine should provide easy access for use. household appliances, and inlet and outlet communications, blocking taps should be available for revision and repair. It is especially important to comply with these conditions when deciding how to install a washing machine under the sink.
The best option for installing the machine is on a concrete or tiled foundation. By using the adjustable feet, a perfectly level vertical and horizontal position can be achieved, thereby minimizing the level of vibration and reducing wear during operation and the risk of vibration damage.
Preparing to install the machine
Any complex household appliances, including washing machines, are carefully packed upon sale. This avoids damage during transport. The factory packaging consists of a box, shock-absorbing and impact-resistant inserts, film coatings for displays, etc. In addition, the tank with the drum of the machine is rigidly fixed with transport bolts. Their removal deserves special attention.
Before purchasing the unit, check if there is a Russified instruction in the package of accompanying documentation. It usually includes a special section on preparation for installation, including the procedure for removing shipping bolts. By following the recommended order, it is easier not to get lost and not to miss a few of them. This is important because turning on a washing machine with shipping bolts can have very unfortunate consequences. The machine can be seriously damaged, including becoming unrepairable. Even if it is possible to restore the unit's performance, you will have to do it at your own expense. Violations of the operating rules, which include the operation of the machine with transport bolts not removed, deprive the owner of the equipment of the right to repair under warranty.
When removing the transport bolts, holes are formed that must be closed with the special plugs included in the delivery.
Electrical connection
Connecting the washing machine to electricity requires grounding. To solve this problem for a specialist is not difficult. The home master can choose the best for himself, the most simple and effective solution from the existing options.
- Replace the aluminum two-core cable (if it fits the outlet) with a three-core copper cable (zero, phase, ground). Install a European standard socket with grounding and waterproof (especially if you plan to install and connect the unit in the bathroom) version.
- Connecting the washing machine to an electric stove socket. These outlets are required to be earthed.
- Connecting equipment in the shield by a separate group (the safest option, but difficult for a performer who does not have the appropriate skills).
There are some nuances that allow you to connect a washing machine with your own hands safely and reliably.
- Maximum protection can be achieved using an RCD (abbreviation for Residual Current Device). A setting of no more than 30 mA should be selected.
- It is not recommended to use extension cords, "pilots", carriers and other methods of extending the cable to connect to remote outlets.
- It is impossible to replace grounding with grounding by throwing a wire on heating or water pipes.
- A jumper between zero and ground will cause false tripping of the RCD.
Water connection
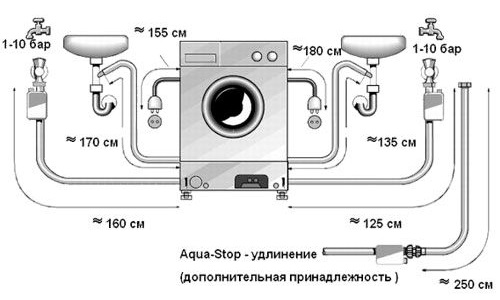
The connection of the washing machine to both the water supply and the sewage system must be carried out flawlessly. This will ensure trouble-free operation of the unit. Let's start by connecting the machine to the water supply. It is carried out using a special hose. When installing the washing machine, measure the distance to the tie-in point from the corresponding hole in the cabinet. The hose must freely (not "tight") connect the inlet to the machine with the water supply. It often happens that the supplied product is too short. It is necessary to purchase a longer hose to replace it.
The general scheme of how to connect a washing machine in the kitchen, bathroom or anywhere else includes connecting to plumbing, electricity and sewerage. If connecting the inlet hose to the machine is elementary, then cutting into the pipeline is more laborious and can be done in various ways.
Sewer connection

Final stage
Even having figured out how to properly install the washing machine and connect it to the sewer and other communications and having completed all the necessary operations, it’s too early to calm down. The final stage of installation is a sequence of certain actions, and only after they have been completed can one be confidently informed that the machine is ready for operation.
If during operation you need, do not rush to call the master, because you can do this work yourself.
About that, and what is needed for this, read in a separate material on the site.
And about the features of sewer septic tanks there is information on the page.
Alignment and leveling
The usual building level is set on the top surface of the washing machine, after which the position of the unit is leveled by adjusting the height of the legs. Repeatedly a similar operation is recommended to be performed at the moment of spinning during a test wash, to minimize vibration.
Tightness of connections
The presence of leaks usually becomes noticeable immediately after opening the water supply tap. If leaks are found, turn off the tap and seal them with FUM tape or gaskets.
Test wash
Test washing allows you to make a final check of all parameters (vibration level, stability of the position of the unit, tightness of connections) and make sure that the machine is ready for use. A test wash in the machine is carried out in the same way as a regular wash, only without laundry. The “washing of cotton products” mode is selected, powder for automatic machines is poured into the corresponding compartment or gel is poured. During the test wash, you should carefully observe the operation of the equipment.
In addition to the purposes listed above, a test wash allows you to wash and remove process contaminants from the system that may get inside during the assembly stage.
Of course, you can also instruct specialists to connect a washing machine - the price for the work will then be determined, among other things, by the installation site and the need to redo existing engineering communications.
Video
If you still have any questions, how to install the washing machine yourself, the video will show you clearly.
Many women consider the best achievement of high technology. They make life much more comfortable and save a lot of time. With such a unit, it is not necessary to collect dirty things for a long time. Washing can be run at least every day. If you do not know how to connect the washing machine to the water supply and sewerage, then our article is for you. Using our recommendations, you can install such a unit with minimal financial costs and on your own.
For high-quality operation of a useful unit, it must be responsibly approached to connect it.
Connecting the washing machine to the water supply and sewerage: where to put the unit
To bring the washing machine home and install it normally, you need to choose the best place for it. This is stationary equipment, to which certain communications are connected and cannot be moved.
Most often, the connection to the water supply and sewerage is made in the bathroom. This is convenient, since pipelines are laid in this room. It is also easy to organize a drain. But if the area in the bathroom is not enough, then the machine can be placed in the kitchen.
Non-standard installation options include the location of the equipment in. In this case, you can use the built-in solutions.
How to connect a washing machine yourself: getting ready for installation
If you decide to connect the washing machine with your own hands, then you should prepare for this. First of all, the equipment must be unpacked and freed from fasteners. Behind are the brackets that are necessary for attaching the hose and power cable. These elements give rigidity to the entire structure.
Bolts are installed on the front wall that hold the drum. All items should be removed and stored. They may be needed when visiting the service.

Useful information! To remove all shipping fasteners, do not start the equipment. This will damage the drum.
Water supply
There are several ways to organize the connection of the washing machine to the water supply and sewerage. Remember that for any of the methods, the pressure in the lines must have an optimal pressure, and the water must be purified. To increase the pressure, a special pump should be installed in front of the equipment. A filter mesh is useful for cleaning.
Let's analyze the following equipment connection options:
- use of a compression fitting. Connect a special hose to the equipment and to the valve that cuts into the structure. This part contains two halves that are put on the pipe and tightened with bolts. A hole is drilled for the passage of water;

- for metal-plastic pipes, a specialized tee or fitting is used. An element is cut out in the selected area and a fitting is connected to which, in turn, a ball valve is mounted to connect the washing machine to the water main;

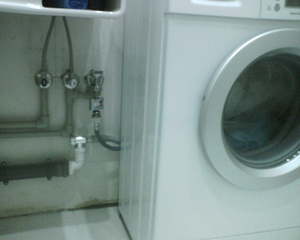
- the easiest method is to connect the unit using a hose to the mixing unit or to connect the toilet bowl to the toilet cistern. It is better to choose the length of the hose used with a margin, and a special tee is selected for it. Before washing, the mixing hose will need to be unscrewed each time. This good way connections, if the equipment and the toilet are located in the same room;

Flexible eyeliner complete with appliances
- if there is no running water in the dwelling, then the equipment can also be connected. To do this, a water tank rises to a small height, and a hose is connected from its bottom to the input in the machine. This will create the necessary pressure in the system.
Related article:
Getting to the choice, you need to decide which model of equipment is better and better. It is with this question that we will try to understand in detail in this review.
How to connect a washing machine to the sewer
Watch the video of installing a washing machine with your own hands. It is not enough to supply water, it is worth considering the removal of contaminated water that remains after washing.

Connection is also done in various ways:
- used to drain into the toilet or into the bathroom. In this case, the upper part of the hose should be mounted 60 cm above the washing machine. Requires special fasteners;
- a siphon is used to drain dirty drains, in which the outlet is located. It should be placed under the knee of the siphon;
- drainage is carried out through the main, the thickness of which is 4-5 cm. The outlet is installed directly on it. A seal is also used, and the hose is wound behind the pipe so as not to affect waste fluids. The top edge should be no lower than one and a half meters from the floor.
Useful information! If your equipment does not have a check valve, then it must be installed taking into account the special water restriction.
Working with electrical wiring
After organizing the drain, it is necessary to connect the washing machine to the electrical network. It is important to pay more attention to this issue. After all, the combination of water with electricity can end in tragedy.

The diagram shows an example of a competent connection
First of all, ground the switchboard. In this case, the thickness of the tire intended for this should not be less than 3 mm. The outlet must also have a ground terminal. If the equipment is mounted in the kitchen, then it can be connected to a socket for an electric stove.
The best option for connecting a washing machine is to use a separate wire that comes from the meter. In this case, the machine must be installed without fail. If there is no separate wiring, then you can use a special RCD.

Useful information! It is forbidden to connect grounding to heating batteries and to various pipes.
How to put legs
The washer is installed in a strictly horizontal position. In this case, the drum is located without distortions. Possible deviation - only 2° . To achieve a level position, the legs are adjusted. The plane is checked with a level. To level the unit, do not use bars, mats or pieces of linoleum.

Related article:
Let's figure out how to clean the washing machine with citric acid and other improvised means in order to increase the life expectancy of the equipment.
Checking for correct operation
After assembly, it is important to check all connections and connections. Then check the circuit again and conduct a test run. It is important to perform all operations in order.

Fill the tank with water. Record the time it takes. It must match what is indicated in the passport. At the same time, check for leaks in the connections. If this is present, then the water must be drained and everything fixed. Then the machine turns on. After 5-7 minutes, the water will heat up to a suitable temperature. When starting the equipment, no extraneous noise is allowed. All modern units should work silently. If you hear a knock and rattle, then this indicates a possible malfunction of the equipment. It is necessary to determine the causes of the noise. Then you should check how the wringer functions and the operation of the drain structure. If everything works as described in the instructions, then you can use the technique.

Video: installing and connecting a washing machine
Proper connection of the washing machine to the water supply and sewerage will allow washing for a long time without excesses. If you decide to do it yourself, then you should start by choosing a place.
Choosing a place to install the machine
Until the delivery of a large box from the store in which the washing machine is packed, you should choose a place where it will be installed. This is a stationary device, in this it differs from its previous developments, which could be easily moved throughout the apartment. Connecting the washing machine to the sewer and water supply is a prerequisite for normal operation, so it is advisable to first decide on the place:
- Many people prefer a bathroom during installation. This is not surprising, because plumbing is connected to the bath.
- Sometimes the size of the bathroom does not allow you to harmoniously integrate the washer, so you have to consider installing it in the kitchen.
- If you are the owner of a small apartment and there is no way to install a washing machine closer to water pipes, it can be arranged as part of the interior in the corridor. But to connect the machine to the water supply and sewerage, additional hoses will be needed.

Unpacking and installation
How to connect a washing machine? After delivery from the store, the purchase must be carefully unpacked. It is necessary to get rid of the fasteners that protected the unit during transportation and fixed all components from damage. Standard fasteners are made from bars, brackets, bolts.
The clips are located under the rear cover of the machine and protect the cord and flexible hose from damage, and also create additional rigidity when moving. The bars lie between the body and the tank and are easily removed by tilting it forward. The transport bolts are located under the back cover, they must be unscrewed.
If you forget to unscrew the transport bolts, the machine will vibrate terribly during the washing process, and it may jump out of place during the spin cycle and drain. After unscrewing the bolts for transportation, the drum of the machine should hang on the springs, this is necessary for further normal operation. The plastic plugs included in the kit should replace the unscrewed bolts. After removal, all fastener parts must be folded and packed; they will be needed in case of transportation to a service to repair a breakdown. What is the wiring diagram for the washing machine?
Connecting the washing machine to the water supply can be done in several ways, the main criteria for this are the necessary pressure in the pipe and clean water. You can increase the water pressure by placing an additional pump in front of the washing machine, and it is cleaned using a mesh filter. Under these conditions, you can connect water to the machine.
If the water supply is made of a metal pipe, you need to attach a flexible hose to one side of the washing machine, and on the other, screw a valve that will be needed to tap into the pipe using a coupling. Such a coupling consists of 2 halves, 1 of which has a threaded outlet for screwing in a tap. The coupling is put on the pipe and tightly fixed with bolts. For water to enter, it is necessary to clear the hole through a threaded outlet, having previously blocked the water supply.
If plastic pipes are used for water supply, you can use a tee (fitting).

After choosing a place for the tie-in, a piece of pipe is cut out, and a fitting is inserted into the resulting opening, on which a ball valve is fixed. The joints must be sealed with rubber cuffs.
Connection without plumbing
And what about the residents of the private sector, in whose houses there is no running water? Do not refuse to purchase an automatic washing machine. To connect a washing machine without running water, you need to install a water tank at a level above 1 m. Connect the machine and the water tank with a flexible hose. Thus, pressure will be created in the flexible hose, and the conditions necessary for the operation of the automatic machine will be met. We connect the drain for the washing machine to the drainage system.
Sewer connection
How to connect a drain? The supplied clean water is half the problem solved, then the connection of the washing machine to the sewer. In this case, using a few simple methods, you can quickly and easily make a reliable drain for the washing machine into the sewer.

The easiest way to drain water is with a plastic hook-shaped device included in the kit. It must be put on a corrugated hose and hooked to the edge of the bathtub or to the sink.
How high should the drain hose of a washing machine be? The main condition is that the upper part of the hose should be no higher than 60 cm from the drain of the washing machine to the sewer. If desired, you can connect the machine to a special siphon with a water outlet, you can buy it at a plumbing store.
You can connect the washing machine to the sewer without a siphon. In this case, make sure that the hose does not touch the wastewater. You may need to purchase an adapter with a check valve so that the washing machine does not drain into the sewer in the opposite direction. If you do all the manipulations correctly, then connecting the drain of the washing machine will not be a problem.
Before connecting the machine to electricity, you must first prepare the ground. The socket should be 3-wire, as the contact of water with electricity can cause a lot of trouble.
Automatic washing machines very quickly gained recognition of housewives, almost instantly replacing the old models, which today are already considered an anachronism. Now the housewives are not even afraid of the need for a "big wash", since the machine does almost all the physical work for them.
Choosing a washing machine in our time can be difficult: they are on the market in a very wide range and vary by manufacturer, functional features and price level. At the same time, not everyone knows how to properly connect the machine to the water supply and sewerage, therefore, in serious household appliances stores, this service is often offered to customers as an additional one.
If such a service is not provided in the salon, you can use the services of private masters, but they take a lot of money for their work. But even a not very skilled owner can easily connect the machine to the sewer and water supply with his own hands.
How to connect your own washing machine
The process of installing the machine and connecting it to communications can begin immediately after it is delivered to the right place. The main steps in this process are:

It is very important that each stage is carried out when the owner has enough free time: most of the mistakes that are made when connecting washing machines with your own hands happen in a hurry. In addition, moving on to each next stage, you need to clearly understand what exactly and why you need to do it.
Choosing the right place to install the washing machine
The most important condition for installing an automatic machine is the possibility of supplying water to it, organization of draining into the sewer and connecting the machine to the electrical network. Most often, machines are installed in bathrooms, combined bathrooms or kitchens.
Sometimes you can see a car installed in the corridor, but such options are almost always accompanied by the presence of long hoses for water and its drain, and this is highly undesirable, since they not only interfere, but increase the likelihood of emergencies.
In the kitchen, free-standing washing machines are installed or built into kitchen sets. The second option is becoming more and more common every day, since kitchens in typical apartments are usually miniature in size and often other options for installing washing machines in these rooms are unacceptable.
Many people think that dirty linen should not be in those rooms where food is prepared, and not everyone can afford to use detergent accurately enough where food products are open. However, the bathroom has an even more significant drawback, namely, high humidity. Here it is necessary to arrange a good hood or organize forced ventilation, otherwise water vapor will cause problems with the electronics, and the metal parts of the machine will corrode faster.
You should also check the availability of reliable grounding of electrical lines. It is important to know that you can only connect the washing machine to a three-pin socket, and the ground must not be removed from the heating or plumbing pipes.
On the video on the Internet, you can see that the washing machine can also be installed in the toilet, if you take sufficient precautions.
Besides, the following points should be taken into account:

If the machine is installed correctly, it should stand firmly on the floor, and if it is too slippery, you can put a rubber mat under the machine.
Removing the machine from shipping parts
To start installing the machine, you should get rid of the carton: that is, remove the box from the machine and remove the foam inserts.
The design of the package is quite often reinforced with wooden bars, which are fixed on screw legs. They must be removed, and then open the main hatch of the machine and check if locking elements have been installed there, as is customary with some manufacturers.
The locking screws that hold the drum in the optimal position for transport must be unscrewed. Usually 4 or 5 of these screws are located on the back of the machine. They are taken out, and plugs are inserted into the holes left from them. It is recommended that you save the screws with the bushings: they will come in handy if you need to move the machine to another location.
There can be many options for connecting the machine to the water supply: the choice depends on the specific conditions and on the plumbing skills of the home master. The machine comes with a hose, one end of which has an L-shape and hands with a certain force is screwed onto the nozzle of the device. The second end is connected to the water supply in an accessible way.
Ways to connect the machine to the water supply can be as follows:
IN polypropylene pipes weld a special element for washing machines is very simple. And the laziest can connect the hose of the washing machine directly to the faucet in the bathroom. Many people think that using such a connection is also quite convenient.
Connecting the machine to the sewer
 In order to connect the machine to the sewer, you need to know a few nuances and features of this process. The easiest way is to use a special nozzle that is put on the drain pipe and pumps water directly into the tub or sink.
However, this method is only suitable for those who wash only occasionally, since not everyone is calm about the fact that soapy dirty water flows to the same place where they wash dishes or people have to bathe. In addition, with such a connection, the washing process has to be carefully monitored: there is an uneven pressure in the hose of the machine, as a result of which the hose can fall and cause a lot of trouble. To prevent this from happening, it's best secure it with a chain or cord.
It is most convenient to permanently connect the machine to the sewer pipe, "in this case, it is imperative to provide an air gap in the drain hose, the height of which cannot be less than the maximum level of water drawn into the bathroom. If this is not done, a "siphon" effect may occur, as a result of which the sewer will begin to suck water out of the machine on its own.This situation causes a failure of automatic programs and can even lead to a backflow of water from the sewer into the machine.It is best to use a special siphon for connection, which has a pipe for drain hoses.To prevent water from flowing out of the machine, the hose should be fixed at the top of the back panel.
If not enough hose length, it can be increased, but it should be borne in mind that for a hose that is too long, the pump power may not be enough. The length of the hose should not exceed 3-5 m3.
Machine installation and test run
The main point in the installation of the machine is its perfect alignment in the horizontal and vertical planes. To do this, the machines are equipped with adjustable legs that can be rotated with the key attached to the device. To check the correct installation, a water building level is used.
Each support should be pressed firmly to the floor, leaving not the slightest gap. Once the machine is installed, fasten screws with locknuts and check stability again. If even the smallest play is found, alignment must be done again so that the machine does not start to "walk" during the spin cycle and does not make too loud sounds.
When the installation process is completed, you need to connect the machine to the mains and run it in a test mode (for example, in a washing mode with a little heating), without forgetting to open the water supply tap first. The connection can be considered complete if, during the test wash, the machine did not rattle, did not move, and successfully completed the task assigned to it.